
After all this trouble setting up, moving and keeping alive our units we should make sure they actually kill some stuff. Obviously the armies strength lies in the assault phase but getting in close combat is not as straight forward as it seems.
Charging and Trapping
It's not always optimal to charge your units into the equivalent of our opponent units. So, many times our Troops should be charging his Elites and vice versa. A good rule of thumb is to charge everything that has weapons that negate saves in close combat with the Boyz and the units that don't with the Nobz. So Grey Hunters should be stuck in with the Meganobz and Assault Terminators with Storm Shields and Thunder Hammers should be attacked with the Boyz (I'll let you do the math). If the target is too squishy of course (most Tau, Imperial Guard infantry etc.) then it can be either way.
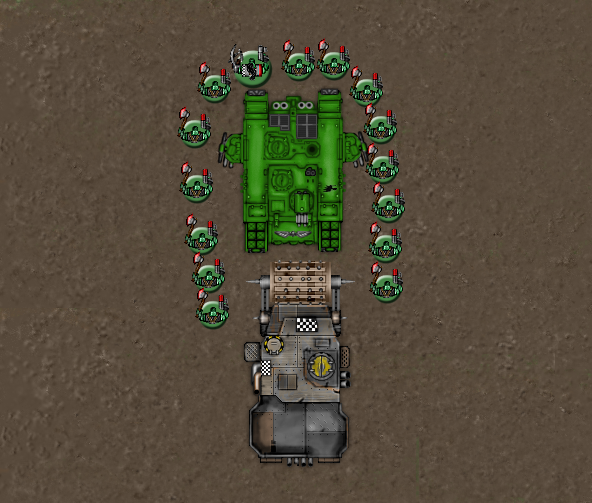
There are some units that I never feel comfortable charging into. There is a couple of ways to destroy them without being involved in close combat. First one is trapping them. This only works if they are embarked in a vehicle. The idea is to surround the vehicle with the Boyz making a U-shape around it and tank shocking with a Battlewagon. This is an example that demonstrates the tactic.
A Battlewagon filled with Boyz closes in a Land Raider that contains 5 Assault Terminators. The opponent is thinking that his Space Marines are safe inside their armour 14 mobile bunker and in the worst case the Land Raider is destroyed he can always charge in the next turn.
But the orks got an ace on their sleeve. They disembark and surround the Land Raider leaving a gap in the front as shown here:
Battlewagon rolls forward and rams the enemy vehicle. D6 S10 hits have a good chance of penetrating and if the vehicle gets destroyed we have the following cases:
Pray that you roll a "5"! Vehicle gets wrecked. This is the best case scenario. The Terminators cannot disembark since they are surrounded by Orks so they get destroyed.
If you roll a "6" then the vehicle explodes. Now the Terminators have to be placed inside the crater (and pass a Pinning check). The Battlewagon will keep on moving Tank Shocking them. If they fail their Morale check will have to fall back on the orks standing behind them so they will be destroyed. Passing the Morale will place them behind your vehicle since there is no other place left to go. You can now charge them in the assault phase without having to go through difficult terrain so won't have to strike last.
Immobilising it is also good for you since now the models inside cannot disembark and will have to stay in there. This will tie up your unit too but it is better than having a bunch of Terminators driving around inside a Land Raider. You can rinse and repeat in your following turn anyway.
Even if you fail to destroy the Land Raider with ramming you will get a second chance in the assault phase. Charge the orks on the vehicle and your Nob with his 4 S9 Attacks has a good chance to damage it. Wrecking or immobilising it will have the same results as above. The less optimal outcome is to destroy it since you will get charged in the next turn but it's worth the chance.
Burna Boyz
Your other best bet of killing units that you don't want to get involved in assault with are your burnas. A smart opponent will know that they pose a great threat so he will make sure and keep his models spread out so you can't score many hits or keep them inside their transports. There is a couple of ways you can counter this.
In this example we park the Battlewagon with the burnas next to one of the Rhino's doors. We ram with another Battlewagon on the other side. If the vehicle gets wrecked then all the passengers have to disembark from the rear door piling up nicely for a the template. If the vehicle gets destroyed then they will be tank shocked and end up bunching up on the left or right of the Battlewagon. Again most of the models will end up under the template. This is a crude illustration using Vassal 40k:


If the enemy unit is out in the open but spread out then we can tank shock it with one Battlewagon forcing the models to move in one side. Again they will be close together making them prime candidates for flaming death.


Few things you'll have to consider here. The tank shocking Battlewagon will have to move at least 6'' so make sure you have judge your distance correctly and it ends up on the models(and not behind them because then they won't have to move). Furthermore the Burnas Battlewagon has Red Paint. This means that you can move more than the 6'' required for tank shocking and still shoot. So you can just tank shock with it (up to 7'') and still fire the Burnas on the same unit. Useful when it is on its own. Also be wary of Death or Glory. You don't want to get shot with a melta from such a close range. Make note that only a model that is directly on the path of the tank shock can attempt Death or Glory. This means that you can still do the tank shock and avoid it if you place your Battlewagon correctly.
Deff Rollas and Boardin' Planks
Obviously the biggest weakness of the list is the lack of long range anti tank weapons. As a whole the orks don't really have any reliable high strength ranged weapons so I tend to avoid them. Rokkitz and Deff Gunz are very situational and I don't want to base my tactics around such temperamental contraptions.
You are going to compensate for that using the Deff Rollas first and then the Boardin' Planks. This gives you respectively 13'' and 15'' range which is as good as a meltagun. Furthermore, since ramming happens in the movement phase and you use the Boardin' Plank in the assault phase, you can kill two different vehicles if they are close enough (4'').
Boardin' Planks are ideal for killing enemy transports. If you didn't use them then you'd have to disembark and charge with the unit. This would leave you vulnerable from enemy shooting and a counter attack on your opponents turn. Now you can destroy the vehicle while being embarked and charge the unit that was inside on a latter turn.
And this concludes this series of articles. I will now have to practise what I preach and use the army next week for the Greek GT. I hope to do well in the tournament (it will be embarrassing otherwise).


Regarding your surround tactic... how are you supposed to get into position for that? If the LR moved up to the Battlewagon in the SM turn, the terms would get out and assault your Wagon, probably killing it. Even if they didn't, how do you deploy your squad on both sides of the Wagon whilst maintaining squad coherency? Then, moving 6" along a LR - chances are you won't be able to wrap around the rear... and if you deploy on just one side of the wagon to maintain coherency, you definitely can't lap all the way round - not without running, which is in the shooting phase, after the battlewagon is supposed to ram it. Speaking of which, if you do ram it and get an explodes result, well you've got a good chance of thinning your numbers enough to invalidate this tactic.
ReplyDeleteAssuming the wagon and LR came face to face in the Ork turn, well your boys can't move into position without running, your battlewagon can't ram after dropping the boyz off, meaning you have to wait for next turn... in which case he tank shocks you and gets out and assaults.
I can't see a way to get this tactic to work against any opponent who is... well to be honest, awake. The rest of the tactics have value mind.
Fair point, I should have made myself more clear.
ReplyDeleteThis situation is achieved only if you are close enough to the opponent. Most of the time I have found that a Space Marine player will either stay still to shoot at you with all of the Land Raider weapons or run away (until there is no more board to go to). If he assaulted the Battlewagon with the Terminators on his previous turn then he would be charged in my turn even if he destroyed it. So I am assuming that he stayed still to shoot at me. Doesn't happen in every game of course, but if it happens you should certainly take advantage of it.
The explosion would kill 6 boyz on average. This would definitely hurt but you got enough of them to still block his movement.
Thanks for giving me a chance to clear this up, I hope the rest of the stuff in the post are not as confusing.