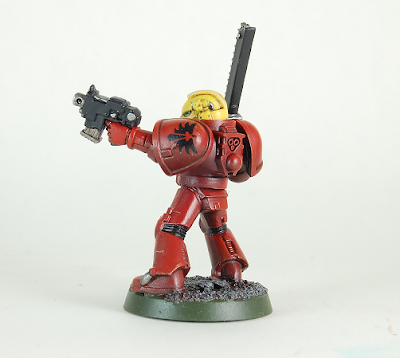
I had a very particular way that I wanted to paint my upcoming Blood Angel army. I know I had to keep the paintjob simple and fast otherwise I will never get around to finish them. It's a small army but still if I kept adding more and more details it would take up ages to complete (if ever). There are a few things that speed up the painting process, mainly airbrushing and washing, so I was going to use them in good effect, I tried what I had in mind on a test piece I made from the Command Squad sprue (still waiting for the other stuff to arrive) and it worked the way I had imagines. So this is how I did it:
- I kept the head of the miniature separate from the the body. I undecoated it white and the rest of the model was undercoated black.
- I airbrushed the body with Mechrite Red and the head with Sun Yellow (Vallejo). For the body I made sure to keep the paint spraying from certain angles so that it would create some natural highlights and shadows.
- I airbrushed the body with Blood Red. As above I only used it at certain angles. The result is a subtle colour gradation.
- Drybrushed Fiery Orange on the body.
- Airbrushed gloss varnish to both.
- Put the transfers on the body.
- Airbrushed gloss varnish.
- Enamel brown wash on both. This worked beautifully with the gloss varnish and I got some very nice panel lining.
- Repainted weapons and other metallic surfaces with a mix of Codex Grey and Chaos Black.
- Painted some parts of the weapons with Chainmail and gave them a wash of Devlan Mud and Badab Black.
- Finished the details (helmet lenses, knee pad etc).
- Painted the base.
- Airbrushed Satin Varnish
This took a little bit longer than I would want to although this was mainly because I wascleaning the airbrush and mixing the new colours for it. When I am painting a lot of models together this won't be much of an issue. I also found out that I should mount the model in a temporary base and paint the final base separately. Then I can glue them together after both are done. This will make it much easier. Keep in mind that this is a quick way (well for my standards) to pain a model. I could do edge highlighting on top but it would take too long and I don't want that. So what do you think?


Looks good, I like the amount of color change you've got going on and the eye lenses seem to look realy nice from what I can see of them. Painting the bright yellow head with a seperate base coat of white was a good call the yellow pops, and the dark red 'shadows' look good in contrast to the lighter red.
ReplyDeleteOne comment is he seems a bit glossy to me, are you planning on matte coating because I see the Satin was your last step.
but yeah I say he looks really good and you should go for it and try to do production style for a whole squad and see how that feels.
cheers
Cheers Mr.Hashshashin. It's not much, just a quick way to paint the guys really but I am happy with the result.
ReplyDeleteI think it looks a bit too glossy in the picture due to the intense light on him. In reality it's more toned down. And I like a slightly glossy finish (I airbrushed with Vallejo Satin Varnish) because it gives the model some natural highlights from light reflectiong on the surfaces plus protects the miniatures really well :)
There are two key differences. Generally, decimal odds are easier to understand. Based on this, there has a movement to attract more people to horse racing by making it more accessible to the average punter.
ReplyDeleteidn poker play
www.sbobet.com