
Since I posted pictures of my Sanguinary Guard yesterday, a few people have been asking how did I go about and paint them. How how did I do the gold armour especially. I will try to explain after the jump.

Gold Parts
I don't like "gold" paints very much so I was looking around for an alternative way to paint my Sanguinary Guard models. I stumbled along a blog that described what's about to follow but to be honest I have no recollection of where I found it.
- Black undercoat
- Airbrush basecoat, 1:1 Chaos Black:Boltgun Metal
- Airbrush highlight, Mithril Silver
- Glaze whole model with Gryphon Sepia. Used 4 coats for uniform consistency.
- Washed Ogryn Flesh on the recesses. For some deeper ones I also used Devlan Mud
- Edge highlight with Mithril Silver
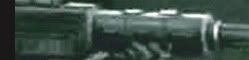
So, this is how I got this effect. However there was a problem:

Either the basecoat or the undercoat wasn't very smooth so some parts of the models ended up looking grainy like this. The Gryphone Sepia glaze pooled into all the small recesses to this effect. I don't think it looks too terrible but it could have been avoided if the surface was smoother. Anyway, I know this now and going to be more careful on my next models.

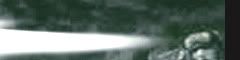
Shoulder Pads/Wings
I didn't glue these on the models to begin with since I wanted to undercoat them with a light grey primer. After that I airbrushed white on the left shoulder pads + wings and red on right (I had preshaded these before). Then I gloss varnished them and gave a light grey/blue enamel pin wash on the left shoulder pads + wings and dark brown on the right ones. I then proceeded to paint the gold parts as I described above and then finish off the details (gems, purity seals etc.).
I was pretty sure some people were not going to dig the chipping on the wings. I had a reason to do this though. Before the weathering, the wings on the backpacks were as bright as the ones on the shoulderpads. They were a bit too bright in fact so I thought that they drew the attention away from the details on the main parts of the model.I did tried to tone it down by using the chipped effect. Still not sure if it was a good idea or not but I hope you can understand my reasoning.
So these are the main points on painting the models. If anyone has any more questions please feel free to ask.


Ohhh i need an airbrush so much.Excellent work Antipope.
ReplyDeleteCheers! Actually the airbush wasn't too useful on these models since you can't see much of the colour modulation in the gold parts. But I guess I couln't do all the varnishing (so no enamel washes either) withought it...
ReplyDeleteYou should definitely buy one, I often wonder how did I paint before I got one myself.
Hey thanks for the tutorial man, I may incoperate some of that into my gold recipe as well. I agree that most gold paint looks for one not at all like reL gold and for two can get a bit gloppy if you atent careful.
ReplyDeleteKeep up the good work
When are you going to start painting some of my models? lol
ReplyDeleteThey look really awesome. Now get cracking on the rest of the army!
Em, when I finish painting mine first? i.e. not anytime soon :P
ReplyDelete